New Post

Showing posts with label iPad. Show all posts

How to Show Smiley and Emoticons in iPhone iPad

Written By Nohara Binti Parahita Niya on Saturday, October 25, 2014 | 2:00 AM

How to Show Smiley and Emoticons in iPhone iPad - IOS device users , both the iPhone , iPad and iPod touch do not need to download smileys and emoticons to the device because this feature already provided by Apple by default . To do this we just need to enable alias activate . Displaying smileys or emoticons while chatting on WhatsApp , or Line , when updating status on twitter and the other will certainly look interesting . Although available smileys and emoticons that you can add it manually to the iPhone with AutoText , using the default smiley would be better , especially the graphics are nice, with plenty of choice and variety of emoticons.

How to Show Smiley and Emoticons in iPhone iPad

You Can active smiley emoticons on your iPhone and iPad

Well , how to enable smileys and emoticons on iPhone iPad are :

- On the iOS device , go to ' Settings '

- Tap ' General '

- Scroll down and select ' Keyboard '

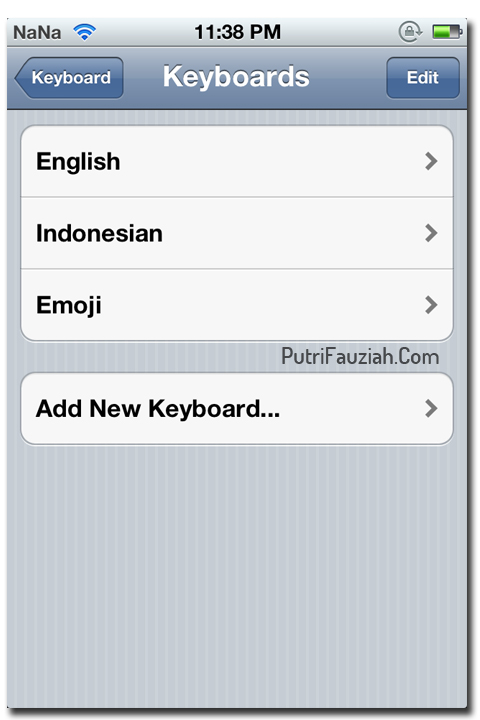
- Then " International Keyboards "

- Tap ' Add New Keyboard '

- Then select ' Emoji '

Smileys and emoticons to use this , for example when opening the application text , image or tap the keyboard icon globe . Will appear smileys and emoticons option that we can use . To return to the keyboard , tap the image globenya once again .

If smileys and emoticons do not appear after following the above steps , you may need to reboot the device first. After reboot emoticons and smileys will usually appear .

Old iOS users , iOS 4 will require an additional application .

- Open the ' App Store ' and download apps ' Emoji Free' . This application is available for free .

- Open the application ' Emoji Free' after installed and wait a while until the process is complete .

- Close the application and restart your iPhone or iPad .

- Well , after that go to Settings » General » International Keyboards » Keyboards » select ' Emoji ' .

- Done .
2:00 AM | Read More
How to Make Auto Text in iPhone and iPad

Written By Nohara Binti Parahita Niya on Wednesday, October 22, 2014 | 5:00 PM

How to Make Auto Text in iPhone and iPad - AutoText is a distinctive feature that is owned by the BlackBerry . Your iOS users as the iPhone and iPad or Android do not need to be discouraged because of the handset you also have this facility . It's just a different name , in the auto - text iOS BlackBerry are named 'Shortcut ' . AutoText on the iPhone and iPad is very similar to that of the BlackBerry . This feature is very useful when we want to send a text message either e-mail , sms , or chat with a fast and practical .

How to Make Auto Text in iPhone and iPad
 
How to make or bring autotext in iPhone / iPad quite easily .
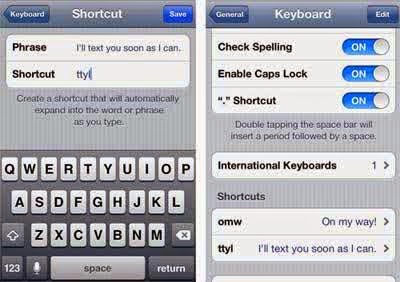
  • Select ' Settings ' and then > ' General ' scroll down select > ' Keyboard '
  • Well , there will be an option to turn on ' Shortcut ' . Slide the switch to the 'ON' position . If my own , function ' Auto - Correction ' and ' Check Spelling ' I OFF - right , my other ' ON' - right .
  • To start adding auto text , on the Shortcut select ' Add New Shortcut ' . Fill ' Phrase ' and ' Shortcut ' that you want. Phrase is the word that you want a short , such as " brb " while the ' Shortcut ' is a short text that represents the phrase in the above example, " Be right back" when writing the message so we do not need to write ' be right back' long but just type ' brb ' then a space , the full text will be raised itself automatically .
Please enter the autotext as many you want , which obviously we must remember the shortcut to the full text memangggil . You can also search for a cute icon text , emoticons , and other Arabic writings . There are many , please search and enter the one -on-one .

In addition to the auto - text on your iPhone / iPad , at the time of typing we can take advantage of other features such as ' press two ' times the ' Caps Lock' key ( up arrow icon ) to type ' all caps ' and press ' spacebar two times ' to bring up the ' point followed by a space ' on the keyboard on the iPhone .

If you have another trick you want to share please add in the comment box below . Good luck !
5:00 PM | Read More

Tips: Before Selling iPhone / iPad, Turn off First 'Activation Lock'

Written By Nohara Binti Parahita Niya on Sunday, December 1, 2013 | 12:00 AM

Lock Activation starts working when you turn on the Find My iPhone app is in the IOS 7 . The security features you can rely on to prevent outsiders from accessing your private data . But when you are planning to sell the iPhone / iPad when you wear this , you inevitably have to turn off the Lock Activation feature .

Tips: Before Selling iPhone / iPad, Turn off First 'Activation Lock' New

Please follow the steps below to turn off Lock Activation on iPhone / iPad :
1 . Open the Settings app on the iPhone / iPad
2 . Select the "Privacy "
3 . Select the " Location Services "
4 . Select the " Find My iPhone / iPad "
5 . Navigate toggle Find My iPhone / iPad to the " Off "
6 . Enter your Apple ID password and turn off Find My iPhone

After performing the steps above , the Find My iPhone will automatically disable the iDevice and you also are ready to move on to the second hand , aka sold to another party . It should be noted that it is important to NOT do a wipe / lock remote , or mark your iDevice as the device is stolen / lost .

If you already sell iDevice into a receiver thrift store , you can turn off Find My iPhone lock through iCloud to perform the steps below :

1 . Sign -in to Apple's iCloud account via icloud.com / # find
2 . Click on the link " All Devices " at the top of the page
3 . Click the device you want to deactivate .
4 . Click the device name link located at the top of the page .
5 . Click the symbol " X " in the next to the name of your device .
6 . Click " Remove" when it appeared a new option

If you are not sure your iPhone / iPad you have to run iOS 7 , please check first via Settings > General > About. Well , in this way , you can sell your iPhone / iPad models to switch to your old iPhone / iPad latest generation without feeling anxious ;)
12:00 AM | Read More

Tips: How to Send Full Resolution Photos from iPad

Written By Nohara Binti Parahita Niya on Friday, November 29, 2013 | 12:00 AM

There are times when you have to send a photo from an email , via mobile devices , such as smartphones or tablets . On the iPhone , for example , when you try to send a picture then when you click the ' send ' option will display a resolution that asks the size you want . From there you can choose the resolution of the images that you want . Unfortunately things like that can not be found in the iPad .

Tips: How to Send Full Resolution Photos from iPad  1 News
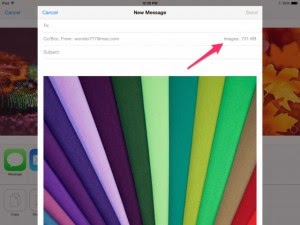
When you try to send a photo from an email via the iPad , the system will automatically convert the image size becomes smaller as the alias instead of the full resolution you want. You probably have experienced this several times , trying to tamper add modifiers in Settings but still can not find a solution ? If so , you can try these tips .

When you are in the mail pop - ups , there is an area called Cc / Bcc . In his right hand looks size image . Unfortunately the size of the image is gray or glance would you see as an option that can not be changed . No need to hesitate , just tap on the gray option . 


Once you tap the gray color option , you will be faced with a new menu that you want. In it you can find all image resolutions to choose from . Well , with the way the photos you send via e-mail on the iPad will be accepted your friend in the full-size full - resolution alias . Good luck !

Tips: How to Send Full Resolution Photos from iPad 2 News
Tips: How to Send Full Resolution Photos from iPad  3 New

12:00 AM | Read More

How to Can Play Youtube Videos Automatically Twice with iYoutubeReplay

Written By Nohara Binti Parahita Niya on Sunday, July 28, 2013 | 1:31 PM

How to Can Play Youtube Videos Automatically Twice with iYoutubeReplay - For iPhone or iPad users who are looking for ways in order to repeat the Youtube app video when it ends, then you are lucky. Because it has come a jailbreak tweak called iYoutubeReplay, available for free in Cydia, which offers the ability to play back video you have seen.

How to Can Play Youtube Videos Automatically Twice with iYoutubeReplay
After you install this jailbreak tweak, then when you have finished watching a video on Youtube a free Google application, then the video will be played back (on my birthday). You can exit (exit) of the video that was repeated by just doing a tap on the back button, or simply close the application.

This tweak the concept is very clear, and useful for you who want to watch a funny video you found for the second time. It is also good if you feel the need to look back at the video there is a scene where you want to believe. What's more to music videos, music lovers would want more than one listen to his music without the need to press the play button again repeatedly.

After this tweak is installed, then you will get a preferences panel on the application settings that you can enable or disable this tweak.

This tweak updated version is being drafted as I write this post, which allows you to enable or disable this tweak directly from Youtube application without the need to get out of it and use the Settings application.
If you want to try to keasikan iYoutubeReplay watch Youtube videos, so you can meet this tweak in Cydia under BigBoss closet. And this is the detail of tweaks iYoutubeReplay.
  •      Price: Free.
  •      Version: 1.0-1.
  •      Requirements for use: Google's YouTube application.
  •      Repository: BigBoss.
  •      Developers: Osama Mohammed.
1:31 PM | Read More

Tips: How To Edit And APN Settings On iPhone And iPad (Jailbreak)

How To Edit And APN Settings On iPhone And iPad (Jailbreak) - You already know how to edit and configure the APN on the iPhone and the iPad also has terjailbreak? If not then you will find how in this post where I will describe it all.

How To Edit And APN Settings On iPhone And iPad (Jailbreak)

The reason why need to edit the APN settings on the iPhone and because Apple provides the ability to disable internet provider for the APN settings, hence our iPhone automatically connects to their network then you will be billed for all access to the data you use.

And the result is there is no way to edit the APN settings when tuning to disable the provider. So if you attempt to unlock the iPhone before being useless, because it will be locked when attempting to access the internet and locked by the Internet service providers that forbid you to edit anything in the APN.

Here are two reasons why you have to edit your APN settings.

     In order to access to the internet.
     Reduce (or prevent) the cost of the bill.

If you have a jailbroken iPhone, you should take the following steps.
  1.      Open Cydia.
  2.      Now search for "APN Editing".
  3.      Click and install the package into your iPhone.
  4.      Respring your iPhone, when a package has been installed.
  5.      Then towards the Data Network Tab on the Settings> General> Network.

In this area you will be able to edit the APN settings to suit you use the Internet network.

If you do not know your APN settings then please see via this link.
1:09 PM | Read More

Steps How to Install and Uninstall Hotspot Shield VPN in iPhone, iPad, iPod Touch

Steps How to Install and Uninstall Hotspot Shield VPN in iPhone, iPad, iPod Touch - Hotspot Shield VPN is a free iOS app for download, with a clear objective of protecting your online activity. In design as easy as possible so anyone will find it easy to learn user interface (UI) provided by this application.

Steps How to Install and Uninstall Hotspot Shield VPN in iPhone, iPad, iPod Touch

But if you want to master it as a whole, then there are areas Help, which provides an explanation of how this application works and what it provides.

However, the security provided of course it is not entirely free. During testing this app, I got a number of facts not wear, which ultimately as our users are charged a monthly or yearly also.

Free facility only for 7 days, where sipengguna will get free protection and compression data provided by Hotspot Shield, which is proving very beneficial.

The facilities provided Hotspot Shield VPN is as follows.
  •     Internet data packets also save money.
  •     Browsing the Internet safely, without identity, and full privacy.
  •     Can access blocked websites wherever you are in contact.
  •     Protect yourself from identity theft problem.
  •     Avoid yourself from a third party trak.
How to download Hotspot Shield VPN:

  1. For those who want to try this app, just use the download app from button here. Will then go directly to the iTunes App Store (you must have Apple ID), to get to the download process.
  2. You must have iTunes installed app are active iTunes account to download and install this application.
 How to uninstall Hotspot Shield VPN on iPhone, iPad and iPod Touch

For those of you who want to uninstall the application or delete it from the iPad, the iPhone is also an iPod Touch then please follow the steps below.

Step 1) Open the iPhone, iPad and iPod Touch you, then head to Settings -> General.

Step 2) When in the General area, find the Profile area and then go into it.

Step 3) Now find (search) Hotspot Shield VPN there, then you tap.

Step 4) You will find a button marked Remove, then click the button.

Step 5)
Beres already, congratulations you have successfully eliminate (remove) or uninstall Hotspot Shield VPN on iPhone, iPad iPod Touch as well.
1:04 PM | Read More

Tips: IOS7 Update for iPhone and iPad - New Features iOS7

Written By Nohara Binti Parahita Niya on Thursday, July 25, 2013 | 5:30 AM

Apple officially release iOS7 for iPhone, iPad and iPod Touch. Are supported by iOS7? Well for iPhone 3GS users should grieve because iOS7 no longer support the iPhone 3GS and iPad 1. iOS7 only available for the iPhone 5, iPhone 4S and iPhone 4, while for the iPad, from iPad 2, iPad to iPad Mini 4, also for iPod Touch 5G.

Tips: IOS7 Update for iPhone and iPad - New Features iOS7
So, what exactly is the latest feature from iOS7? To be sure iOS7 appear flat but certainly with the beautiful artistic eye. If at first glance may be the same as the display icon in the Windows Phone, but certainly iOS7 look better. Well, here are some of the latest features that are important to know iOS7.
Control Center - If you have ever used SBSetting, then of course it would not be familiar with the name Control Center. In the Control Center, we can access brief menu (shortcut) to turn off / turn on wifi, set the brightness up to Airplane mode setting. Easy way to access the Control Center, the live Swipe Up (swipe up) on your iPhone screen.
Notification Center - live Swipe Down, then you can easily access the new email, sms, to do list, until a missed call. Fairly easily and quickly access new emails or know your daily schedule.
Multitasking - Now, you can switch from one application to easily and quickly, and you even see a preview of the various applications that are running. So that makes you, getting cool to perform multitasking.
AirDrop - Want to share photos via Bluetooth or Wifi? Do not worry about the AirDrop feature you can now easily share photos with fellow users iOS7.


iTunes Radio - Want to listen to radio on your iPhone, now you can do it easily, without the need to install additional applications, because iOS7 already built-in iTunes Radio.
Find My Phone - This security feature, in iOS7 further enhanced. Now, if you lose your iPhone, you can easily find by using Find My Phone. Do not worry, because now the Find My Phone feature can not simply be switched off, it means Find My Phone will continue to be active, as long as we do not enter our iTunes account data
5:30 AM | Read More

FREE: EMOTICONS AND SMILEYS TO YOUR IPhone, Ipod Touch AND iPad

Written By Nohara Binti Parahita Niya on Saturday, June 8, 2013 | 8:26 AM


One hidden feature in iPhone, iPod or iPad is the Emoji Emoticons, Smiley Icon and funny that could send either by email, sms or simply write notes on your iPhone. To enable Emoji on the iPhone, the easiest step is to install an emoji app available in the App Store, of course, choose a free application.

Go to the App Store menu, search Emoji so you will get a variety of options that can Emoji apps like Emoji Icon Free Download, Super Emoji Keyboard, Emoji Free.

Choose a free application like Emoji Emoji Free! Install this application on your iPhone or iPad.
Emoji Free

Once installed, run Emoji Free! And the first time you run it will look like below.

add a new keyboard on the iPhone

Seen that we were told to add a new keyboard on the iPhone, do I go to Settings - General - Keyboards - International Keyboard - Add New Keyboard and add Emoji.

So that later you will have the Keyboard as below.

adding Emoji keyboard on your iPhone

After adding Emoji keyboard on your iPhone or iPad, you can test to add Emoticons or Smiley in iPhone. In the example below we try to write notes on your iPhone with Emoji Emoticon adds. To start adding Funny Emoticon and Smiley in iPhone hit the Globe in and select Emoji Keyboard.

Then you can begin to choose emoticons and smileys that you want on your iPhone, iPod Touch and iPad.
8:26 AM | Read More

Using Facetime On iPad 2 Features

Written By Nohara Binti Parahita Niya on Thursday, May 2, 2013 | 8:00 PM

Facetime On iPad 2

Continuing the article about the iPad 2 tablet review some time ago, this article we will discuss all things about Facetime in iPad 2. How to activate it, and what we can do.
As we understand, together, this feature is a killer app that staying able to attract market attention. With the presence of cameras in this new iPad, then we can interact between users iPad 2, iPhone 4 and Mac face to face wherever located.


The application first appeared along with the launch of the new Apple phone when it is, the iPhone 4. This feature is considered as Apple\'s answer to a similar feature in 3G phones. But not Apple\'s name if only plucks ideas other applications without any modification.
In contrast to video call which became one of the 3G services, Facetime deliberately not made to run on cellular pathways. Some suspect it was intentionally done Apple for playing it safe, eliminating the `external factors\' causing air-quality pullback videocall. So, Facetime can only be used via the WiFi. (Except if you have an iPhone 4 dijailbreak).

By walking in the path of the WiFi connection will be relatively stable and the quality of the talks would be better than using the 3G.
The story continues and the iPad 2 came out carrying the same features. The only advantage is the width of the screen that will be more satisfying when you really want up to do with Facetime. Even with the same resolution (VGA) will not appear on the screen as wide as it is solid.

So how do I use it?
1. Facetime access through its application icon.

2. Enter your Apple ID. Email on your Apple ID will be some sort of alias ID Facetime phone number to be reached from any other device. Meaning is different from the iPhone 4 Facetime using phone number attached to the device.

3. If you do not have, or want to differentiate with accounts registered in the Macbook for example, just make. Click on create new account. Enter accurate data in the columns that appear.

4. If you\'ve signed in, you will find a page where the contact\'s name will be on the right side. If your iPad 2 has been no contact, click the plus sign to include Facetime email your friends and family.

5. Click the contact to connect Facetime.

What can we do at Facetime?
A. You can move the small screen (which is a preview of the display we had seen the other person) to all corners of the screen for video calls better. But you can not eliminate them.

B. You can change the position of the screen, just rotate iPad from portrait to landscape or vice versa. This is very useful if you intend to bring more people in one camera at a time.

C. You can press the home button to open another application. Speech (voice) with the speaker will still take place, just on the other side, you are considered middle pause Facetime. You can resume it by touching the green bar above the home screen.

D. You can change the camera used for the other person displayed on the screen by touching the camera switch button (far right camera image with arrows on both sides).

TIPS Improving Quality Facetime
1. Make sure you start using Facetime in a room full of light. Or at least enough lah. Because if you do it in the room light, the image will be seen with noise.

2. Use the WiFi signal path and use the most powerful high-speed internet provider.

3. If your face is too big for Facetime. Try using landscape orientation
8:00 PM | Read More