New Post

Showing posts with label Android. Show all posts

How to Disable Auto Updates on Android Smartphone

Written By Nohara Binti Parahita Niya on Tuesday, September 30, 2014 | 9:44 AM

How to Disable Auto Updates on Android Smartphone - Often, the auto update ? Many or few applications that you use on Android smartphones , but you may want to choose which application you want to update rather than let auto update do its work . Of course, disable auto update on Android smartphones can be done easily , but for a beginner it may still not know how take it.

How to Disable Auto Updates on Android Smartphone

How to disable auto update on Android smartphones can be done via Google Play Store application . The following are the steps you need to do if you want to disable the auto update on Android smartphones :
  1. Open Play Store application .
  2. Open the menu on the top left corner . You can also access the Play Store menu by sliding from the left side of the screen to the right .
  3. Open the Settings tab , then select Auto - update apps .
  4. After you press the Auto - update apps , and will display a pop - up windows .
  5. Select " Do not auto - update apps " .

Easy , is not it? If you want to update the application , then you can go back to the previous settings . These tips KitKat tested on Android 4.4.4 , but the Android version ever before also has a similar way to disable auto - update apps .
9:44 AM | Read More

How to hide your Caller ID on your Smartphone Android

Written By Nohara Binti Parahita Niya on Tuesday, August 26, 2014 | 12:00 AM

How to hide your Caller ID on your Smartphone Android - Want to call friends but don't want your identity known? If you recently switched to Android maybe you still haven't learned how to hide Caller ID when calling using the Android smartphone. Basically hide your Caller ID is pretty easy to do using the Android smartphone.

How to hide your Caller ID on your Smartphone Android

Whatever the reason you're doing it, you can hide your Caller ID when calling using the Android smartphone. The following are the steps that you must do if you want to hide your Caller ID when calling using the Android smartphone.

1. open the Settings in Android smartphone
2. open the Call menu Settings
3. open the Additional settings
4. open the Caller ID
5. switch to Hide number

Easy, isn't it? By following these steps then Caller ID will not be visible when you make a phone call. Good luck:)
12:00 AM | Read More

Choosing the Right Android Smartphone, this trick

Written By Nohara Binti Parahita Niya on Friday, May 16, 2014 | 1:30 AM

Android mobile platform has become the choice of most manufacturers of smartphones in the world . Different from the iPhone which pegged the prices , models , and limited specs , the Android smartphones it offers many options for consumers . It was welcomed by consumers because they can choose Android smartphone with specs and pricing as needed according to ability .
Choosing the Right Android Smartphone, this trick
With a large selection of Android smartphones on the market , meaning that it would be difficult to choose a single Android smartphone that suits you rather than choose an iPhone . Therefore , if you are planning to buy a smartphone in the near future , you can use the following considerations :

1 . How much money do you have ?
Most expensive Android smartphones cost the same as the iPhone but of course there are many Android smartphones were sold cheaper . High-end smartphones such as the Galaxy S5 and HTC ( M8 ) could be an option for your deep pockets and need speed and full features to support your work . If you do not want to try a new smartphone , you can try out the Galaxy S4 or HTC releases of 2013. If you just want to experiment , guaranteed locally made Android smartphone will not drain your wallet .

2 . What software do you need?
Business software is the most important thing that you should consider before buying a phone . Software will determine how you will interact with your phone , what you can do and what it can ease you can .

In dasaranya same properties in all Android smartphones . What distinguishes it , the producers add custom skins so that each interface on the smartphone look different , as well as additional features .

If you want an Android smartphone with a simple software , you can choose a smartphone that runs stock Android . That is, you can choose the Nexus 5 , Moto X or Google Play version of the popular Android phone , or select only local products . Moto X not running stock Android , but Motorola did not do a lot of customization in it .

If you want an Android phone that is equipped with many additional features , such as the ability to open the application in a different window , the Galaxy S5 is your choice . Besides the Galaxy S5 also features a power - saving mode so that you can save battery under certain conditions .

3 . How big is the screen size you want ?

Currently the average size is 5 -inch Android phone . This size is large enough and comfortable to watch videos , view photos , read emails also ebook . If not big enough , you can choose the Galaxy Note 3 ( 5.7 inches ) complete with the S - Pen stylus . If you do not want size too big , you can buy an Android smartphone release last year .

With three considerations above , you can now specify which Android phone is best for you . Once again , please think about the budget you have , the software you need as well as a large screen size you want :)
1:30 AM | Read More

Tips: How to Install Android Applications (APK) in BlackBerry

Written By Nohara Binti Parahita Niya on Tuesday, May 13, 2014 | 12:30 AM

As you know , the BlackBerry 10.2.1 release some time ago has provided the ability to cool the BlackBerry 10 handsets . Means that is install Android application files ( APK ) automatically into the BlackBerry 10 handsets . Though such capabilities have long given the BlackBerry but still there who do not understand how to install Android apps on BlackBerry 10 .
Tips: How to Install Android Applications (APK) in BlackBerry
If previously you have to do sideloading who took meticulous process via computer , now you simply download the APK from the Android app you want and install directly into the BlackBerry 10 handsets . More detailed steps to install Android applications to BlackBerry you can see below :

1 . 's APK file
You need to find the APK file from Android application that you want, such as Instagram , Pinterest , etc. . A number of reliable sources that you can visit to download APK :

- Amazon App Store
- 1mobile Market
- Train APK ( website )
- Snap APK Downloader

2 . Transfer APK files to BlackBerry

If you download the APK file via computer then you should move it into your BlackBerry handset . Please use USB , or send using email , Dropbox , etc. .

3 . Install APK files to BlackBerry
If you download the APK directly using the browser on the BlackBerry then automatically download window will appear and ask if you want to save the file . Just type it and then tap .

If you move the APK file from your computer then you can just look for the location of the folder / location where you move it . Or use the magnifying glass icon to search for files ending in . Apk and tap to install . Wait for it to finish .

With three easy steps above you can directly run Android apps on your BlackBerry phone . That is , you do not need to wait for the official version of BlackBerry applications to be able to use it . However, it should be noted that the above method does not guarantee an application can run as advertised . It does not run away, because Android BlackBerry while you ' forced ' to run Android apps on BlackBerry handsets . Curious ? Try it !
12:30 AM | Read More

Tips: Download BBM 2.0 For Android (FREE DOWNLOAD)

Written By Nohara Binti Parahita Niya on Saturday, May 10, 2014 | 4:56 PM

When the fuel is the most popular messenger application in this universe , do not be surprised if many more android gadget behavior , partly because of this application . this is certainly bring fresh air to the Blackberry , it's just going to bring a negative impact to sales gadgetnya anyway . Recently, there is a new feature of the fuel is fuel and fuel video voice for Androi and iOS , although it had already installed complete in BB OS 10 as BBQ10 and BBZ10 . This feature will be there in the version of BBM for android 2.0


BBM for Android beta 2.0 have support to do free phone and video calls . The above two features topnotch voice comes through BBM and BBM Video . However , this is not a beta application can be downloaded on Google Play . Users on the site can get the Blackberry Beta Zone .

How to Register

Blackberry Beta Zone is a beta tester hangout users who are trying to applications ' trial and error ' Blackberry . As the name implies , a beta application is not final applications that still need improvement and need user feedback .

Related to Android BBM beta , need registration process in the Blackberry Beta Zone before doing the download and installation . Here are the steps :

  1. Visit the Blackberry website here .
  2. On the right sidebar , please click Sign In if you already have a Blackberry ID . If not , please register at this link .
  3. If the login is successful , in the BlackBerry Beta Zone main page please click linked text Calling all Android users!

Download BBM Android Beta

The next step ie, downloading apps BBM for Android beta . Here are the steps :
  1. After clicking the linked text Calling all Android users! it will be delivered to the new page at the following link .
  2. Still on the page , please click the blue link below the article Click the link bellow .
  3. We will then be taken to a page Cross - Palform fuel . On the right sidebar , please click on the Register Now interlocked text .
  4. If so, please do the registration and download process , or so waiting list if the program is already full Android BBM beta . We can enter the waiting list .
4:56 PM | Read More

Tips: How to Use Google Maps in Offline Mode (iOS & Android)

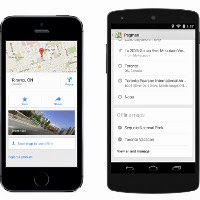
Tips: How to Use Google Maps in Offline Mode (iOS & Android) - The latest update of Google Maps for iOS and Android brings a number of new features . Offline mode is one of the new features that are very useful for everyday purposes . Features offline mode allows users of Android and iOS devices can access the Maps app without an internet connection . So , how do I use it ?
Tips: How to Use Google Maps in Offline Mode (iOS & Android) 1
How to use Google Maps in offline mode is almost the same in both iOS and Android devices . Here are 5 easy steps you need to do to use Google Maps in offline mode .

First , you need to install the latest update Google Maps , the version 3.0 to version 8.0 for iOS and Android . If your Android device is not getting updated , then you should check it more often because I was a little slow in releasing an update to Android .

Tips: How to Use Google Maps in Offline Mode (iOS & Android) 2

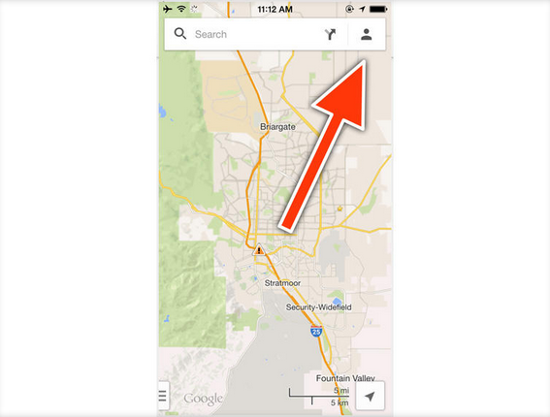
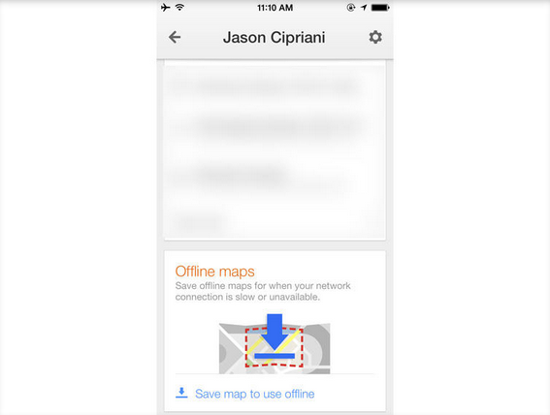
Second , after the update and open the Google Maps application and press the profile icon which is located right next to the search bar . Next slide into the bottom of the page and you will find offline maps.


Tips: How to Use Google Maps in Offline Mode (iOS & Android) 3
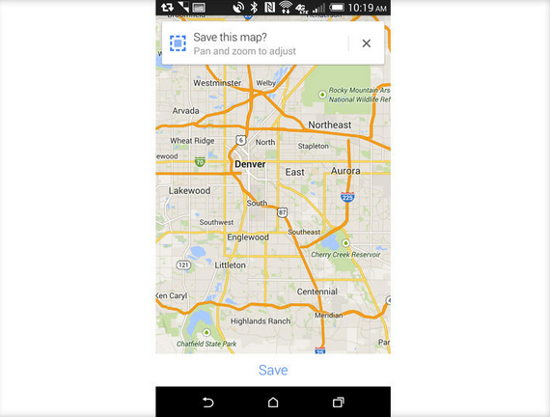
Third , there are two ways to store offline use . The first is through the setting and the second with megetik " OK Maps" in the search bar every time to show a map .

Fifth , after activation maps storage then you will be able to increase or decrease the area on the map and the last store on iOS or Android device you are using .


It should be noted , each map is stored only survive in iOS or Android device for 30 days . Chances are, after 30 days the application will remove the map that you have saved .
12:05 AM | Read More

15 Tips Regarding Android Phone (Best Trick)

Written By Nohara Binti Parahita Niya on Thursday, May 8, 2014 | 1:30 AM

15 Tips Regarding Android Phone - Mobile phones with the Android platform is not new in Europe . But for the majority of mobile phone users in Indonesia , the presence of the handset with Google's open system can be fairly new .

15 Tips Regarding Android Phone (Best Trick) New
After Android entered Indonesia last year through bundling cooperation between Telkomsel and HTC , Android has now started to bloom again since the service launched Indosat participate by holding six mobile phones belonging to a number of leading vendors .

The sixth mobile phone is the HTC Hero , Motorola Milestone , Samsung Galaxy Spica , LG GW 620 , Huawei U8230 , Sony Ericsson Xperia X10 .

In order to make it easier for customers who have purchased the Android phone , Indosat also provides answers to the 15 questions most frequently asked about this cool handset .

1 . How do I know the version of firmware or OS Android in the handset ?

To find out the firmware version installed on the handset can be done by looking into the Launcher Menu > Settings > About phone , Firmware version menginfokan info on the firmware version installed on the handset .

2 . How do I download the APN settings for internet data access needs and MMS with a SIM Card Matrix Indosat 3G Broadband ?

To download the apn settings for internet and mms data needs to be done to the Launcher Menu > Settings > Wireless controls > Mobile network settings> Access Point Names forwarded by pressing the Menu button and New APN . Put the following two parameters :

HSDPA / EDGE / GPRS :
Name : Indosat 3G
APN : indosat3g
Username : indosat
Password : indosat
MCC : 510
MNC : 01
APN type: default

MMS :
Name : Indosat MMS
APN : indosatmms
Username : indosat
Password : indosat
MMSC : http://mmsc.indosat.com
MMS Proxy : 10.19.19.19
MMS port : 8080
MMS protocol : wap 2.0
MCC : 510
MNC : 01
APN type: mms

For users outside the Matrix 3G Broadband , for the info APN , which must be set for internet data access is indosatgprs . As for Matrix users ( 0855/bright ) and IM3 for MNC values ​​that must be set are MNC : 21 .

3 . How do I find out the total size remaining in the internal storage and SD Card handset ?
To see the total size of storage is left on the handset and SD Card installed can be seen in the Launcher Menu > Settings > SD card & phone storage . There will be informed the total storage is left to the handset's internal storage and SD Card .

4 . Document How to enter data , photos and other into the SD Card in the handset ?
In order to insert the file into the SD Card in the handset can be done by connecting the handset to a PC / laptop via a USB cable followed by pulling down the notification bar at the top of the home screen on the handset . Select the USB connected followed by pressing the option button mounted up on the PC / laptop will display a pop - up windows or removable disk and forwarded by copying files you want to put in the SD Card handset .

After putting the files to the SD Card , to disable right - mapped SD Card in the PC / laptop can be done by pulling down the notification bar at the top of the home screen on the handset again and select turn off USB storage and hit the off button .

5 . How can I make can set the network used always to the 2G network ( GSM only ) ?

To set the network to 2G network used always be done in two ways , namely :

    Go to the Launcher Menu > Settings > Wireless controls > Mobile network settings , tick "Use only 2G networks "

    Go to the phone and press * # * # INFO # * # * or * # * # 4636 # * # * , after it went into Phone information and set preferred network type to GSM Only .


6 . How do I log in google account in android handset ?

To be able to login or use a google account can be done by opening one of the google apps that exist on the handset , ie apps gmail , gtalk and market . The first time an application is run we will be asked to enter a user and password we google account .

7 . How to reset back to normal when the handset is to buy a new ( factory reset the data ) ?

Factory reset or restore the data to the default settings of the handset can be done by going to the Launcher Menu > Settings > Security followed by selecting / pressing Factory Data reset .

8 . How do I replace the google user account that is being used in the handset ?
To replace it we have to sign out of the Google account that is being used after it to login as another user . To sign out can be done in two ways:

    Go to the Launcher Menu > Settings > Applications > Manage application and in application Gmail , Gmail storage , Google Apps and Google search did clear the data after the user logged in with the new

    By doing a data factory reset , but this way all the data and applications installed on the outside of the handset that are default internal storage should be erased so do backup data with the backup / restore before doing so


9 . How do I forward a SMS that come from?


Forward SMS can be done by pressing and hold the message you want to forward it to forward SMS option menu appears and then enter the destination number to be sent .

10 . How do I install an application from the * . Apk that was downloaded ?

Before installing a file * . Apk of an application , be sure to Launcher Menu > Settings > Application > Unknown source already ticked . After that do :

    Put the * . Apk of apps on SD Card

    Install Astro File Manager application which can be downloaded and dinstal of market

    Click on the * . Apk files are placed in the

    Wait until the application is finished installed


11 . How to change the ringtone into silence mode and vibrate on the handset ?

To change the ringtone into silence mode and vibrate can be done by pressing and holding the power button to exit the menu and forwarded by choosing silence or vibrate . To turn back to the menu reads , do the same thing as before .

12 . How can so contact data in Microsoft Outlook can be moved into contact in the handset ?


To move the contact data stored in Microsoft Outlook can be done with the data mengexport in contact Microsoft Outlook into a csv file after which the data is imported into an existing contact in the Gmail web so that the data will be recorded on the handset when processes synchronize Gmail running .

13 . How do I move an existing contact in the sim card to the contacts on the handset ?

To copy an existing contact data in the sim can be done by pressing the menu button on the handset and into the Import / Export which then select Import from SIM card out of the menu options .

14 . How to turn off the T9 on the keyboard ?

To disable right - T9 when typing can be done by going to the Launcher Menu > Settings > Language & keyboard > Android keyboard , did untick the Prediction or Suggestion .

15 . Is it possible if you want to add a ringtone to the handset ?


Ringing tone or a ringtone can be added beyond what was given in the handset . One way is to create a directory called media on the SD Card , where in the media directory for directory also ringtones for phone ringtones that you want to add , directory notifications to notification ringtones , and alarms directory for ringtones alarms are used . Put the ringtone file to be added according to the ringtones directory will be used .
1:30 AM | Read More

Track the Galaxy Note 3 Under the Code

Written By Nohara Binti Parahita Niya on Wednesday, May 7, 2014 | 12:30 AM

Track the Galaxy Note 3 Under the Code - Samsung today has a tradition to instill a different processor in each device . To distinguish it , Samsung has used a series of code that consumers can determine the type of device he has. Different processor , the different types of numbers listed .

Track the Galaxy Note 3 Under the Code nEW
Unfortunately , Samsung does not provide more information about these codes and leaving consumers guessing themselves for the purpose of a row of a combination of letters and numbers.

The following are the types of all the Galaxy Note 3 in circulation around the world , who managed the team Noharasolution compilation.

You can see the type of device on the outer wrap of the Galaxy Note 3 .

    SM - N9002 : Dual Sim variant for the Chinese market
    SM - N9005 : LTE variant
    SM - N900K : KT Telecom for South Korea
    SM - N900L : for LGU + South Korea
    SM - N900S : South Korea's SK Telecom to
    SM - N900W8 : on Canada
    SM - N9000Q : for region of Turkey
    SM - N900A : for AT & T USA
    SM - N900P : for U.S. Sprint
    SM - N900T : for T - Mobile USA
    SM - N900V : for Verizon Wireless
    N9008W : Note 3 - Telcel Mexico
    SM - N900 : International variant ( including Indonesia
    SLC22 : for AU KDDI Japan
    SGH - N075 and SGH - N099 : NTT DoCoMo for Japan
12:30 AM | Read More

3 Unique Keyboard for Android Devices

Written By Nohara Binti Parahita Niya on Monday, May 5, 2014 | 12:00 AM

3 Unique Keyboard for Android Devices - No one can deny that some keyboard apps like Swype , SwiftKey , and Google Keyboard , is one tool that is very easy for Android users to type messages or posts . But in fact , it was not only given the ease by just three applications .

3 Unique Keyboard for Android Devices new

There are some applications of digital keyboards are quite interesting , and challenging Android users in typing . Curious to try a few apps keyboard for use in Android devices ? Consider the following list :

Minuum
Applications which was released in 2013 it has a very minimum , because it is only present in one line display of the device . This application is suitable for use by a smartphone that has a small screen . The letters also have been sealed in a row , but still within the standard QWERTY .

To use it , simply use Noharasolutioners movements or certain gestures . You can make a sweeping motion ( swipe ) to remove , add a space , and initiate voice dictation . Minuum has a number of interesting features , but Noharasolutioners must redeem the cash value of U.S. $ 3.99 or approximately USD 48 259 .

Flesky
Flesky managed to make a breakthrough in the world of Android , since its launch this year . Because this application did not display the usual row of letters such as a keyboard . Other designations , Flesky is invisible keyboard application .

The application itself relies heavily on technology predictions . Naturally , because we ourselves had to type in a word or phrase with a bit of guessing. But when you start to find it difficult to type with a keyboard is not visible , then you can bring up the QWERTY row by downloading a swipe from the bottom to the top of the screen with two fingers .

MesssagEase
This keyboard will be a bit confusing for Noharasolutioners who are not accustomed to typing in English . Because , MessagEase not standard on the QWERTY , but ANIHORTES . According to the developers , a row of letters ANIHORTES is most often used in writing a word or phrase .
To use it , Noharasolutioners must begin by tapping one finger shifting capital letters and small letters to you , such as using the telephone dial pad . Pretty easy , but it took habituation themselves are also quite long .

Unfortunately , standard ANIHORTES consumer still can not be maximized when typing in Indonesian , as far as the team JerukNipis try . But when Noharasolutioners often use English , then this keyboard can increase typing speed .
Dare to try this unique keyboard , Noharasolutioners
12:00 AM | Read More

6 Easy Steps to Securing Smart Android Device from Malware Attacks

Written By Nohara Binti Parahita Niya on Sunday, May 4, 2014 | 4:00 AM

6 Easy Steps to Securing Smart Android Device from Malware Attacks - Securing the smartphone is one of the most important things that must Noharasolutioners do , given the importance of these devices in your life . Malicious malware attacks are also becoming more and more rampant making a smartphone or tablet you look frail and easy to be infected with various viruses .

6 Easy Steps to Securing Smart Android Device from Malware Attacks New

However , there are some easy steps to minimize the chances of malware to attack your smart device . What are the steps ? Check out some tips that have been stacking Noharasolution team :

Trusted Apps Store
In order to maintain the security of your smart device , Noharasolutioners shall download applications directly from the source or from the apps store is reliable . That is , you have to download it from Google's app store , Amazon , Samsung , Microsoft , and several other apps store was constructed by a trusted company .
But again , Noharasolutioners mandatory smart to choose the app before downloading it . Because the Google Play Store itself had " conceded " , because the application of fuel had circulated false when the world of smart devices amid a scene with the emergence of BlackBerry 's messenger in the Android and iOS platforms .

Suspicious applications
As mentioned earlier , has many applications without circulated false further scrutiny . Therefore , Noharasolutioners at least took a little time to read the reviews before deciding to download the application .
Pirated apps
The term pirate may be closely related to the illegal act . But in the long run , the applications will be able to destroy hijacked intelligent devices belonging Noharasolutioners .
Download and install the APK program circulating unofficially risks large enough to make smartphones and tablets Noharasolutioners infected with malware . The users of BlackBerry 10 could be the most dangerous , because often make side - loading Android applications . So , be careful before it 's too late .

Who tinkers Menu Settings
Google has provided a variety of options to filter malicious applications . One is to provide the option "Verify Apps" . This option can Noharasolutioners found in "Settings" menu , for you who have used the device at least Android 4.2 operating system .
By checking this option , then you have been asking the system to check and scan an application first, before actually installed on the device .

Software Update
Logically , the higher a software , the more stringent security system is also a device . So, be diligent to update the operating system of the smart device or software Noharasolutioners .
Software updates will usually fix the system , eliminating interference bugs , and adds a variety of features that are believed to improve the quality of security .

Application of Anti - Virus
The final step is to install an anti - virus program on your smartphone . But as Noharasolutioners may already know , there are many anti-virus applications in today's digital world . Of course , you are required to choose the best .
Avast , AVG , BitDefender , Kaspersky , Sophos , Symantec Norton , and TrendMico are some of the best anti-virus name to protect smart devices Noharasolutioners . But for more details , refer to the course list below :

So , ready to securing smart devices Noharasolutioners ?
4:00 AM | Read More

Android Tips: How to Increase Response Speed ​​Home Button on Galaxy S5

Written By Nohara Binti Parahita Niya on Wednesday, April 16, 2014 | 6:46 AM

Android Tips: How to Increase Response Speed ​​Home Button on Galaxy S5 - Today the Galaxy S5 began circulating in 125 countries . If you are a customer who has booked Galaxy S5 via one of the largest cellular operator in Indonesia, following is a brief tips to improve the quality use of Galaxy S5.

Android Tips: How to Increase Response Speed ​​Home Button on Galaxy S5 2
After passing through the unboxing process, you may find that the home button response rate from your new mobile phone that is still open from the pack a bit slow. No need to worry too much that your cell phone is a defective item, because there is a feature that prevents the smooth response rate home button Galaxy S5.

Samsung delivers a new shortcut for the feature S Voice, which is enough to do a double-tap on the home button. For some people, this shortcut will obviously be very useful considering they like to interact through voice commands. However, for users who prefer the conventional way, then it is obviously disturbing, because the response rate is slightly slower phones so due to waiting to see if the user will press the 2nd tap to make access to S Voice.

If you fall in group 2 and Galaxy S5 want you to respond as quickly as possible, then you'll want to disable this shortcut. The trick? Just enable S Voice; either via a double tap on the home button or through the app drawer, then tap the menu button in the upper right corner (form 3 vertical dots) and tap the 'Open via the home key' which is located under the 'Wake-Up.' By checking the option, then you have to disable double-tap shortcut via the home button. Easy is not it?

After disabling the option, you will find that the response rate will increase the home button. If you want to use S Voice, simply access the feature via the app drawer or via toolbox. Good luck!
6:46 AM | Read More

Android Tips: Capture Screenshot on Galaxy S5

Written By Nohara Binti Parahita Niya on Tuesday, April 15, 2014 | 6:32 AM

Android Tips: Capture Screenshot on Galaxy S5 - Still on Galaxy S5, Samsung's latest flagship product is officially circulated in 125 countries starting today. If you had been reading tips on how to improve the response of the home button on the Galaxy S5 , there are now other tips on how to capture a screenshot for your latest mobile phones.


For those of you who have previously used the Galaxy series phones, the first way is similar to the previous method. But for those of you who previously was an iPhone user, just different key combinations used alone.

The first way is by pressing the home and power button simultaneously. If you are not familiar, this method may be a little difficult because both buttons must be pressed simultaneously. As soon as you hear the distinctive sound of a camera shutter, meaning what is displayed on the screen has been successfully captured. To access it, just open the Gallery application OR via the file browser 'My Files' to see it. If you want to access it via PC, files this screenshot you can access the folder '/ pictures / screenshots'.

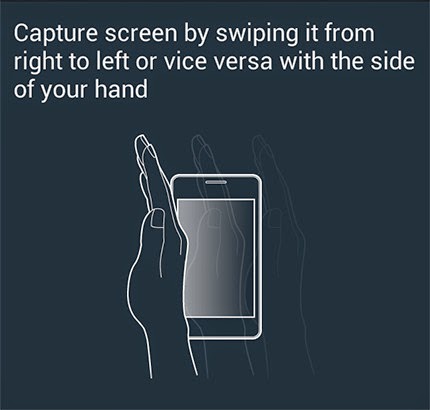
Well, the 2nd is a much easier way, also be cool. If there is a shortcut to the previous S Voice activation via the home button, Samsung has now also added a new shortcut to capture screenshots: enough to tilt the palm of your hand, then touch the palm of the hand to the side of the screen and do a swipe from right to left. Easy, is not it?

However if you are concerned that this feature will actually make you accidentally repeatedly capturing screenshots, you can also turn it off. Simply access the settings menu, find the option 'Motion' and select the option 'Motion and gestures,' then tap the 'Palm swipe to capture' to turn off the shortcut
6:32 AM | Read More

How to Overcoming Android Devices Start 'slow'

Written By Nohara Binti Parahita Niya on Monday, December 9, 2013 | 4:41 PM

How to Overcoming Android Devices Start 'slow'- Having a mobile device is very necessary in today's life . However , Noharasolutions would get annoyed if your Android phone or tablet suddenly becomes slow and often experience lag .

How to Overcoming Android Devices Start 'slow' New
Do not worry . Noharasolution team will give you some tips for your Android device back in operation quickly and more efficient batteries .
Uninstall or disable unused applications
Each device has a limited storage capacity . The more unfilled internal memory is full , it will be the slower the performance of the device . Therefore , it is time to take action Noharasolutions clean . One of them is doing penyortiraan document images and videos , as well as uninstall the application is not important .
To uninstall an application , then Jerukers just need to go to " Settings " . After that , access the " Apps" and select the application you want to uninstall . Default application which is called bloatware can not be eliminated . But Jerukers can still disable it by selecting "Disable " .
Clean cache
The data cache will always appear along with the use of applications on an ongoing basis . Unfortunately , the cache will also affect the Performance Jerukers device . You can do the cache cleaning operations by performing the same steps as you read the tips first . But if you want to delete the cache at once , then you need a separate tool .
Use the App Cache Cleaner or Clean Masters to clear the cache of data in mobile devices Jerukers . Both are also available for free .
Limit use of widgets and live wallpapers
The existence of widgets will indeed facilitate Jerukers in accessing the information needed , without having to bother opening the application in question . So also with live wallpaper which of course will make your smartphone look more pleasing to the eye . However , the presence of both will drain battery power .
Reduce the presence of a widget that takes a lot of data , such as Facebook . Way too easy , Jerukers only need to touch the widget rather long and pulled to the top of the screen . In this way , then your device battery will be more efficient and speed up the processing system .
Live wallpaper is also one of the facilities that slows performance smartphones and tablets . Immediately change the wallpaper with a static image , surely you device will work faster .

Turn off animation
To perform these tips , then you have to go into developer mode . The trick is very simple . Perform tap seven times in the " Build Number " which can be found in the " About Phone " , in the " Settings " . After that , Jerukers will have greater access to your phone .
Immediately go to the " Developer " in the " Settings " . Search option " Drawing " . Then , turn off the " Windows Animation Scale " , " Transition Animation Scale " , and " Scale Length Animator " . Once completed , the phone will
Noharasolutions work faster than ever before .
Always update the
There is a reason behind the release of software updates . One is to improve the ability of a device . Therefore, there is nothing wrong with being a "sissy update " in this case .
Noharasolution should always check the availability of software updates on a regular basis . The way is easy : Go to "Settings" menu , followed by " About Phone " . Then touch the option " System Updates " . When available , then do not hesitate to immediately perform the software update .
Rooting and roming
These tips should be done by those who have a really expert and in-depth understanding of Android devices . By rooting , then
Noharasolutions will have the ability to overclocking the processor , install the ROM as needed , and other things that is necessary .
However it should be remembered , this activity shall be preceded by performing a data backup . In addition , Noharasolution also not responsible if the post- crash rooting and roming . ( U.S. )
4:41 PM | Read More

Tips: SOLUTION FOR BBM ERROR ON ANDROID (Update)

Written By Nohara Binti Parahita Niya on Friday, December 6, 2013 | 4:17 PM

Tips: SOLUTION FOR BBM ERROR ON ANDROID (Update) - Finally after a month in limbo pending and clear with no BBM For Android then slid well to Playstore ( October 21, 2013 ) . Lots of laughter happy because clarity and patience to wait for the messenger .but nevertheless pays some of us who have not been sampled or have not been installed , it is because factor of many things , Let's refer to the following :

Tips: SOLUTION FOR BBM ERROR ON ANDROID (Update) New
  • BBM For Android only support in ICS ( 4.0 ) above : That is for droidindos who still use air android device OS Gingerbread , Froyo , éclair down then it will not be able to taste this Messenger . The trick is to upgrade the Android OS to OS ICS minimal . What if the official update is not available ? Try using CusRom , partly because there were successful using this method , but it certainly will not be as good as smoothly and if we use the official ROM . There must be some BUG , or perhaps it could be Cusrom does not support it .
  • If the OS is 2.3 or CM7 : Please download the application here ( Download )
  • Fuel For only android device with hardware support for certain : Many of us are still using Android Device with Low class , so BBM for Android does not run properly or is not compatible with our device is . To fix this please try to download the application here ( download ) or here ( download ) .
  • If not successful Tip No. 3 : Mean CPU does not support us , Please note that BBM For Android currently support ARM v7 compatible processor . To find out whether we are ARM v7 processor Compatible HH can be checked using the app " Device Info " can be downloaded from PlayStore , check here ( download ) . Checks on the ARM v7 CPU with info or armeabi - V7A
  • BBM for Android does not support for tablets : If the support does not try to download the application from the following link ( download ) . If it still does not work make sure the tablet has support GSM network
  • BBM For Android Application not found in PlayStore : If not found please try downloading it from here ( Download )
  • Hard to create ID of fuel : If it is difficult to apply through the application should try to register and Make her ID through the official website ( here )
  • Long wait Reply Email : Most of us have a quick get a reply email and there are some long , it dikarnakan fuel still raged then surely the situation will impact the service is not good . Logically, if more traffic is congested then chances nyampe be long . So please be patient to wait for a reply to the email, and if you can not wait then there is a solution that is by borrowing or using ID our friends or relatives who have registered their email .
  • Difficult Sign : Go to Settings > Apps > BBM . Select Force Close, Clear Data , Clear Cache , and then go back BBM for Android app . It is intended to reset the BBM app for Android like the first time when the application has not been executed . If you still do not want to simply try to point 10 below.
  • Login Error ( No Connection ) : Please login using the network better , I suggest using WIFI .

If all the above tips can or can not fit then note the following :

 
BlackBerry users who download limit fuel to use chat application

he new BBM app launched back ( October 21, 2013 ) The new available exclusively to users who pre - register or register to order the application of fuel moments before launch

While users who have never done pre - register to be patient for his smartphone to run on the fuel . Users who ever did pre - register will be directly invite by BlackBerry to download and enjoy cross- platform BBM service

BlackBerry gives top priority to the users who have already pre - register . This is to reduce download and user traffic . and to anticipate the flood of users who download and use apps at the same fuel as happened in september lalu.hal is done so that the process of the launch of BBM on Android and iOS runs smoothly and does not happen down as a month earlier .

Based on information from the official blog BBM.com , BlackBerry just said it would be coming soon to the millions of other customers as quickly as possible .

Possible BlackBerry will wait until the system is deemed safe and ready before launching the fuel for all users . Readiness itself depends servers owned by the BlackBerry .

For new users , or are still confused with the above discussion , and not understand how to install BBM for android so please refer to the way Install BBM For Android ( Here )
4:17 PM | Read More

Tips: Sharing Contacts Android with iOS 7 (iPhone)

Written By Nohara Binti Parahita Niya on Tuesday, December 3, 2013 | 1:00 AM

Tips: Sharing Contacts Android with iOS 7 (iPhone) - Are there any of the readers here as an iPhone user ? and the iPhone is already getting updated IOS 7 ? if yes then this artike might be useful , or if not then there is no harm we share tips for how to share android contacts with IOS 7 .

Tips: Sharing Contacts Android with iOS 7 (iPhone) New

IOS 7 raged again discussed by the users of the iPhone , a lot of changes from the previous OS , including in terms of the display itself . Well , if we want to try to share contacts from android device to iOS device 7 then consider the following topics :
  • Gmail Android we Mandatory syncron first, and all the contacts stored in Gmail , to refer here who do not know how ( View )
  • After that, iOS device to the iPhone we then go to Settings
  • Select Menu Mail , Contacts , Calendar as shown below :
  • Select Add Account , then it will look like the image below . Because Android by default, use Gmail Account for then please select Google Sync .
  • Then fill in all the data
  •  If all the data is completed filled then please go back to the menu Mail , Contacts , Calendars and select Import SIM Contacts
  • Once the process is complete then the SIM contacts inpor Auto all the contacts stored on Android previously entered into in our iPhone .
  • Finish
1:00 AM | Read More

How to Turn off Application Notifications in Android Jelly Bean

Written By Nohara Binti Parahita Niya on Thursday, November 28, 2013 | 12:08 AM

Notification of a variety of active applications on your Android phone was very helpful indeed facilitate checking . But for some people perhaps a number of applications that are not too important it would be very disturbing if the notification appearing constantly. Fortunately , in Android Jelly Bean you can set notifications for each application directly from the Settings app .

How to Turn off Application Notifications in Android Jelly Bean New

No need to sign - out of the Facebook app , for example , if you do not want to disturbed by any notification of comments that get into your Android phone . You can still active various applications that you need and check the incoming notification at a later time when you leisure .

To be able to turn off the notification that there is a specific application on your Android phone , open the Settings app > application> tap the app you want > uncheck 'Show notification '

Well , this way you can still turn on a number of applications without having to interfere with the incoming notification for each app . Good luck ;)
12:08 AM | Read More

How to Sideload CyanogenMod Installer

CyanogenMod Installer is an application that will simplify your Android CyanogenMod ROM installed on your phone / tablet Android you. Unfortunately, today I ask the CyanogenMod withdraw the application from Google Play Store.

How to Sideload CyanogenMod Installer New

For those of you who have not had time to download CyanogenMod Installer, you can download it directly from the official CyanogenMod for then do sideloading manually. How sideloading CyanogenMod on your phone / tablet Android you can do by following the steps below:

1. Open the Settings app and select 'Security.' In some Android device, you will first be asked to select the option 'Applications.'

2. Navigate to the ops 'Unknown sources'

3. If the 'Unknown sources' have been checked, you can run through this step. If not, please tap on the box to uncheck it. Tap OK.

4. Download CyanogenMod Application Installer. From the phone / tablet Android, please go http://get.cm/app via a web browser or scan the QR code below.

5. Once the download is complete, open the notifications and then tap OneClick.apk. Tap Install. Tap Open.

6. Follow the instructions displayed on the screen of your Android phone to continue the installation process.

7. Download CyanogenMod Windows Installer. Click here to download CyanogenMod Installer for Windows Visa/7/8.

8. CyanogenMod Run Installer for Windows and follow the instructions that are on the screen.
12:00 AM | Read More

How to Install 'Google Experience Launcher 5 on Android Nexus Owned Devices KitKat

Written By Nohara Binti Parahita Niya on Wednesday, November 27, 2013 | 12:05 AM

Google Experience Launcher is in KitKat reportedly awarded exclusive to Nexus 5. While Google is spreading the Android 4.4 update for the KitKat Nexus tablet Nexus 7 and 10 , it seems increasingly clear that the two tablets are not going to get a Google Experience Launcher like the one in the Nexus 5 .

How to Install 'Google Experience Launcher 5 on Android Nexus Owned Devices KitKat
How to Install 'Google Experience Launcher 5 on Android Nexus Owned Devices KitKat New

Although the Nexus 7 and 10 get improved performance and user interface design through a KitKat but it looks that characterize Google Experience launcher can not be found in the update . In other words , large changes in Android such as presence status and navigation bars transparent , app icons with larger sizes as well as Google Now in the home screen , only available on the Nexus 5 .

If you are the owner of Nexus 7 or Nexus 10 and has been manually install Android 4.4 KitKat and did not find a Google Experience Launcher in it , do not be too disappointed . You could try to install Laucher owned the Nexus 5 after install KitKat .

Not only for the Nexus 7/10 , will each have a device that runs Android KitKat you can install Google Experience launcher separately .

1 . Please download the APK file from the launcher Google Experience Android Police website .
2 . Copy the file to your Android device and then install.
3 . Run Google Experience Launcher as your other running Android launcher ( Settings app > Home )

In this way the KitKat Android phone you have, any make or model , will be able to get Google Experience Launcher experience , complete with the integration of Google Now on the homescreen , and vavigaiton status bar transparent , etc. . Good luck
12:05 AM | Read More

Android Tips: Enable Voice Command 'OK Google' in Nexus 5

Written By Nohara Binti Parahita Niya on Tuesday, November 26, 2013 | 2:00 AM

If today you are one of the lucky ones to be able to get the Nexus 5 ( or Nexus G ) , either by way of through a friend / brother or your abroad because you really are living abroad ( outside the U.S. ) , you may find that features voice command ' OK Google ' does not work on your Nexus 5 . No need to worry excessively , because the feature is still not designed to function in areas other than the U.S. 

Android Tips: Enable Voice Command 'OK Google' in Nexus 5

Android Tips: Enable Voice Command 'OK Google' in Nexus 5 New
 
For those of you who are unfamiliar with this command , ' OK Google ' a voice command that will allow you to access the voice assistant on the home screen , without the need to touch the phone screen at all .

After you say OK Google, you will be able to ask Nexus 5 to perform a series of tasks such as setting reminders , send SMS , browse to help you in the street and find points of interest , or play music files that you store on your phone .

 If you're curious to try it , there is an easy way to enable this feature :

- Go to the ' Settings , ' and select ' language & input '
- Select ' Voice Search' and ' Language '
- Change language option to ' English ( U.S. ) '
- completed

This feature is definitely only able to function in the command of the English language. During the dialect you speak and what you say does not command too complicated , Google software will be able to recognize and carry out your orders . Good luck !
2:00 AM | Read More

Pixlr Express apk - Android Application Edit Photos

Written By Nohara Binti Parahita Niya on Saturday, August 10, 2013 | 1:00 AM

Pixlr Express apk - Android Application Edit Photos - What is Pixlr Express? As the name implies Pixlr Express is a solution for those of you who would like to enhance your photos quickly, with just a few touches then your photo has been edited to be more attractive. Although not many more features Pixlr Express is an innovative yet old player dijajara image editing application. author with Pixlr-o-matic, but with a simpler setting and fast. One of the best photo editing application for android.

 Pixlr Express apk - Android Application Edit Photos

Edit photos on Android phone with Pixlr Express Applications
Pixlr Express is a photo editor application for Android sucked free on Google Play Store, although free but quite attractive and easy to use and able to quickly edit photos in a touch.
With the Android app Pixlr Express enables us to cut cdepat images, resize, and repair any image such as removing red eye, and whiten teeth. It is also available in more than 600 effects, overlays, and to beautify the look of the picture frame.

What are the features of the Pixlr Express apk - Edit Photo Android Applications, including the following:

• Crop / cut, resize / change the size, strength and rotate images easily.
• 'Auto Fix' photos - features for color balance, adjusting for the dark photos and poor lighting conditions with one touch
• Remove red eyes and whiten teeth fast and simple.
• Overlay - a feature to adjust the mood - amplify the tone, meredupkannya, also adds to the feel surreal.
• Lighting Effects to add the image look more dramatic, sparkle or a grunge look. Easily adjust the intensity and orientation of each effect.
• There is a wide choice of frames.
• There are many photo effects to make it look professional eating like blur, adjust the focus, denoise and more.
• Share your images directly with your friends through social media such as Facebook, Instagram, twitter or share your favorite apps, or just save them back to your gallery.
• photos will be edited can be selected from a memory card or directly from camera photo
• as well as many other interesting features.
Overall excess of free android photo editing application is easy to use and able to quickly change the look of photos with just Pixlr Express does not have a place to share photos directly owned as instagram or even android photo editing application made in Indonesia as PicMix and PicStory

Download Pixlr Express Apk - Android Apps Edit Photo
This Android app is available free for your android and can be downloaded via Google Play Store, the latest version is Pixlr Express 1.2 Apk with size 6.2 M and can be installed android 2.2 and above for both android phone and android tablet.

Play Store Link: Pixlr Express apk, free click here
1:00 AM | Read More